Contents
- 1 Aims
- 2 Key Information
- 3 What You Will Need
- 4 Process
- 4.1 Preparation
- 4.2 The learning activity
- 4.2.1 Assignment 1: stage wagons
- 4.2.2 Assignment 2: cassettes
- 4.2.3 Assignment 3: elevator
- 4.2.4 Assignment 4: hemp fly system
- 4.2.5 Assignment 5: drum fly system with two sets
- 4.2.6 Assignment 6: rail fly system
- 4.2.7 Assignment 7: rope wagon fly system
- 4.2.8 Assignment 8: flying clouds
- 4.2.9 Alternative versions
- 4.2.10 Presentation
- 4.3 Assessment and feedback
- 5 Our Experience
- 6 Credits
Aims[edit]
The project will:
- Introduce the functioning of Baroque stage machinery
- Give better insights into the mechanical principles involved
- Demonstrate the real-life issues with mechanics (friction, inertia, and so on)
- Inspire you to use traditional techniques in contemporary applications
Key Information[edit]
| Number of learners | Groups of 2 – 5 students |
| Number of staff | 1 teacher |
| ECTS Credits (if applicable) | Not applicable |
Learning process[edit]
| Lecture/seminar | Lecture, presentation, discussion (face-to-face or online) | |
| X | Making project | Making a model, mock-up, plan or design (physical or digital) |
| Performance project | Making a performance or demonstration (live or mediated) | |
| Records and Archives | Interviews, photographs and videos of artefacts, annotating archives, creating learning materials (physical or digital) | |
| Independent study | Reading, researching, analysing and evaluating learning materials (physical or digital) in groups or alone |
Type of learner[edit]
| X | Student of technical theatre |
| X | Student of theatre design, architecture |
| X | Student of theatre arts |
| X | Professional |
| X | Researcher |
| General public |
What You Will Need[edit]
Duration and schedule[edit]
The duration depends on the how far the setup is already prepared.
Setting up a system takes 3 to 4 hours.
Rigging and testing, which is the core of the exercise, takes about 30 min – 1 hour per system, depending on the type of system.
Room or type of space[edit]
A theatre studio or construction workshop, or other space where equipment can be suspended from the ceiling.
Equipment[edit]
This workshop is equipment intensive, but most of the equipment can easily be made in a basic workshop or ordered in a CNC workshop (see Additional Information and Resources, below).
- Ropes of different sizes
- Different types of pulleys (ceiling attached, fixed on ground, … )
- Cleat rail or other attachment system
- Small counterweights
- Scale drum and shaft
- Scale winch
- Scale multiple speed drum
- Wooden sticks (scale battens)
- Fly rail
- Fly wagon
- Stage structure (some rostra/risers or similar)
- Ladder
Optionally, some scale scenery.
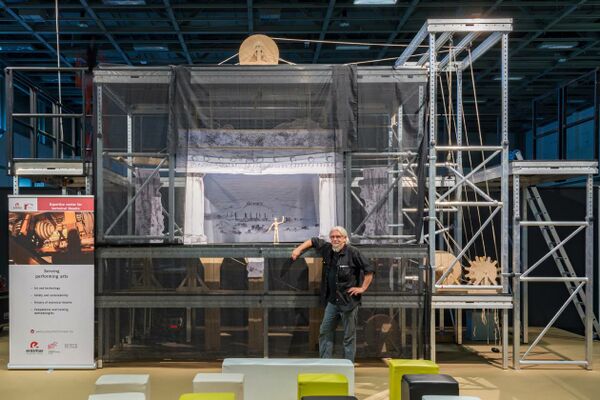
The RITCS 1:4 stage is a sophisticated version of what is needed, but most of the exercises can be done with a much simpler set-up:
Materials (consumables)[edit]
- A range of screws and fasteners
Learning resources (books, websites)[edit]
Canonbase articles:
- J.01 Reconstructing the Past: The stage machinery of the Colosseum
- A.04 The Transforming Stage: Synchronised scene changes
- Photographs of the Bourla Theatre wooden stage machinery
Other resources:
Process[edit]
Preparation[edit]
Setting up the system(s)
- Each mechanical system can be set up separately or as a complete model, as required.
- This is done only once and stays the same for different groups.
- The basic techniques are:
- Stage wagons
- Cassettes
- Elevators
- Hemp flying system with battens
- Person flying system with wagon
Prepare an introduction to historical techniques
Prepare a safety briefing.
The learning activity[edit]
Introduce students to the different historical techniques, focusing on what the result is, but not how they work.
Give students the safety briefing, covering following points:
- Even when working at 1:4 scale, we are still working at height
- Weights will be lifted or moved. The same rules as in full-size practice apply
- Equipment will be rigged overhead – again, the normal rules apply.
If needed, students are given some training on making basic but safe knots.
The students are given different assignments. These can be done in one model stage, by one group, or in several stages simultaneously, with groups rotating between them.
Assignment 1: stage wagons[edit]
Students are given 4 wagons and a setup with two rails on the (under)floor. In a first phase, they are asked to make them move simultaneously (two go in, two go out) and in both directions. Only one rope is allowed to control the final movement.
In the second phase, they can use counterweights. They are asked to make the movement without applying any force.
Ideally, they find the solutions themselves, but if they get stuck they can fall back on schematics.
Assignment 2: cassettes[edit]
Students are given a (pre-mounted) cassette and a winch. In the first phase they are asked to rig it and move the cassette up and down with the drum.
In the second phase, they can use counterweights. They are asked to make the movement without applying any force.
Ideally, they find the solutions themselves, but if they get stuck they can fall back on schematics.
The assignment can be extended with multiple cassettes, to be moved simultaneously.
Assignment 3: elevator[edit]
Students are given pulleys, ropes, two cassettes and an elevator platform. In the first phase they are asked to build and rig the elevator and move it up and down.
In a second phase, they get a drum and counterweights. They are asked to adapt the elevator for smooth functioning with minimum effort.
In a third phase they get a sliding stage floor. They are asked to build the elevator under the sliding stage floor and rig the floor. At the end, they should show a smooth changeover with an actor coming or leaving the stage.
Assignment 4: hemp fly system[edit]
Students are given pulleys, ropes, a batten and a prepared backdrop (for folded flying). In the first phase they are asked to rig the set with 3 lines and move it up and down.
In a second phase the batten for folding is added to the set. They are asked to make different types of movement to get the best result for the set.
Ideally, they find the solutions themselves, but if they get stuck they can fall back on schematics.
Assignment 5: drum fly system with two sets[edit]
Students are given a shaft and drum, pulleys, ropes, two battens with prepared backdrops or borders. They are asked to rig the sets with 2 lines in a way that one moves up when the other moves down.
Ideally, they find the solutions themselves, but if they got stuck they can fall back on schematics.
Ideally, the drum is at a height, but it can be done also with a drum at ground level.
Assignment 6: rail fly system[edit]
Students are given a fly rail with a small wagon, pulleys, ropes, a puppet (Barbie or Ken type). They are asked to rig different flying movements:
- A horizontal flight
- A vertical flight (swing)
- A bench flight (seat for two puppets) vertical
- A two-dimensional flight (with independent movements)
- A diagonal flight
For each flight, they have to test, experiment, and find ways to ensure smooth movement.
Ideally, they find the solutions themselves, but if they get stuck they can fall back on schematics.
Assignment 7: rope wagon fly system[edit]
Students are given a rope wagon, pulleys, ropes, a puppet (Barbie or Ken type). they are asked to rig different flying movements:
- A diagonal flight
- A curving flight
- A random flight (two dimensional)
For each flight, they have to test, experiment, and find ways to ensure smooth movement.
Ideally, they find the solutions themselves, but if they get stuck they can fall back on schematics.
Assignment 8: flying clouds[edit]
Students are given a multi speed drum, pulleys, ropes, and a set of clouds. They are asked to rig the clouds so that they use minimum space when up and align as a complete picture when they are down.
(This could be combined with a bench flight for the ‘Gods’.)
Alternative versions[edit]
It is also possible to conduct project as more of a lecture/presentation type of activity. This can be done with a larger group, where for every assignment a couple of students are asked to do the rigging and the others can support them, ask questions, give ideas, document...
A gamified variation on this gives each student the option to forward the assignment to a student of choice. This creates a maximum of engagement and turn-around.
Presentation[edit]
Presentation is not core to this assignment, but students could after each round present their solutions. If there is insufficient time for all groups to do all assignments, each group can present and explain their assignment to the others.
Assessment and feedback[edit]
The project is not designed to be formally assessed. Students get feedback informally during the process from the teacher. A group discussion at the end of the project will help students reflect on and embed what they have learned.
On the other hand, the project could be used to assess skills like ‘long life learning’, ‘technical creative thinking’, ‘research skills’, ‘problem solving’, … using the usual methods.
Our Experience[edit]
Tips[edit]
The choice for a scale one to four is essential but not absolute. Smaller scales will not demonstrate the problems with friction and so on, because a human can easily overcome these forces. Larger scales can be used, but are more labour-intensive and require greater risk management for the same result.
When sets or puppets are used, it may help to add some weight to them for proper functioning.
Students learn most from finding solutions themselves. Ask questions, give hints, but no answers!
Even if this looks like a very technical exercise, enough focus should be on operating and smooth movement – the performance aesthetics of the machinery. This is the most difficult part.
Safety Notice[edit]
This a relatively low risk activity, depending on the setup. There is working at height risks for some assignments, but limited, as well as suspended loads and manual handling. In a full-size version, or with a general audience, further safety considerations will be required. In any case, ensure you follow the procedures and regulations in your locality, and always do a risk assessment.
Additional information and resources[edit]
The Canon Tools include a growing collection of Wooden stage machinery construction drawings, with both 2D drawings and 3D models, which can be used to build 1:4 scale stage machinery.
Photos of the RITCS 1:4 stage:
A time-lapse video of the RITCS stage being erected:
Credits[edit]
| This learning method was made by: | Chris Van Goethem |
| Institution: | RITCS (EhB) |


