Five laboratory exercises with rope block and tackle
Contents
- 1 Aims
- 2 Key Information
- 3 What You Will Need
- 4 Process
- 4.1 Preparation
- 4.2 The learning activity
- 4.2.1 Exercise 1: Single block on the ceiling for lifting
- 4.2.2 Exercise 2: Single block with pulling rope inserted in wall to gain power
- 4.2.3 Exercise 3: Double block and tackle to gain power
- 4.2.4 Exercise 4: Double block and tackle to gain speed
- 4.2.5 Exercise 5: Block for changing direction when moving objects
- 4.3 Assessment and feedback
- 5 Our Experience
- 6 Credits
Aims
After the exercises, students will understand how blocks and ropes can be used to:
- gain lifting power
- gain lifting height
- create speed
- move objects
- create a change of direction.
Key Information
| Number of learners | Between 4 and 8 in each group. Several groups can do the exercises in parallel, if enough equipment is available. |
| Number of staff | 1 teacher |
| ECTS Credits (if applicable) | Not applicable |
Learning process
| Lecture/seminar | Lecture, presentation, discussion (face-to-face or online) | |
| X | Making project | Making a model, mock-up, plan or design (physical or digital) |
| X | Performance project | Making a performance or demonstration (live or mediated) |
| Records and Archives | Interviews, photographs and videos of artefacts, annotating archives, creating learning materials (physical or digital) | |
| Independent study | Reading, researching, analysing and evaluating learning materials (physical or digital) in groups or alone |
Type of learner
| X | Student of technical theatre |
| X | Student of theatre design, architecture |
| Student of theatre arts | |
| X | Professional |
| Researcher | |
| General public |
What You Will Need
Duration and schedule
Preparation by the teacher: 2-4 hours preparing equipment and materials
Preparation by the students: None
The workshop: 1 day of 6 working hours. Less if students already have knot-tying skills.
Room or type of space
Classroom, studio theatre, workshop, or other space where loads can be suspended. If you don’t have a suitable space, see the ‘Tips’ section below for how to work at model scale.
Equipment
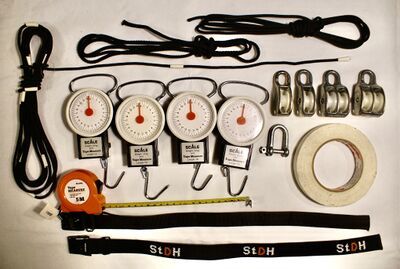
- 2 ropes 4-5 mm each 15 metres long
- 2 lengths of 4-5 mm rope, 10 metres each
- 2 lengths of 4-5 mm rope, 5 metres each
- 4 single blocks for 5 mm ropes
- 2 double blocks for 5 mm ropes
- 4 shackles and/or
- 6 straps
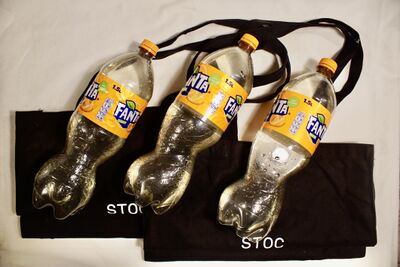
- 2 fabric bags (able to hold at least 10 kg each)
- 7 1.5-litre soft drink bottles with cap
- 4 hanging scales for 0-25 kg (the type that can weigh a suspended load, e.g. for luggage)
- 1 roll of gaffer tape
- 1 tape measure (centimetre scale)
The soft drink bottles are filled with water to act as counterweights during the laboratory sessions. A 1.5 litre bottle weighs 1.5 kg.
Materials (consumables)
None
Learning resources (books, websites)
Canonbase articles:
Other sources:
Jay O. Glerum, Stage Rigging Handbook, Southern Illinois University Press, 3rd edition 2007
R. W. Boychuk, Nobody Looks Up: The history of the counterweight rigging system 1500-1925, Grid Well Press, 2015
Process
Preparation
Preparation by the teacher:
- collect equipment and materials
- prepare a short presentation on the historical use of rope-operated stage mechanics and pulley systems in theatres
- prepare a safety briefing - see the safety notice below
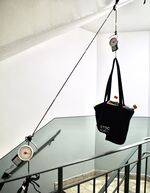
All of the exercises can be carried out in a classroom, provided that there are fixing points in the ceiling for the blocks. The attachment point should be able to support about 10 kg. If this cannot be guaranteed, another room should be used. This could be, for example, in a stairwell where the attachment points of the stairwell railing could possibly be used as attachment points for the blocks.
Always consult with the venue manager when choosing a venue for the exercises.
The learning activity
Give a short presentation on the historical use of rope-operated stage mechanics and pulley systems in theatres, to give the context for the exercises.
Give a safety briefing – see the safety notice below.
Check that the students who will be taking part in the exercises can all use the following knots:
- Clove Hitch/Clove Hitch on the bight,
- Round turn & two half hitches,
- Bowline
- Reef knot
- Overhand loop
Take time if needed to ensure all students are confident with these.
Exercise 1: Single block on the ceiling for lifting
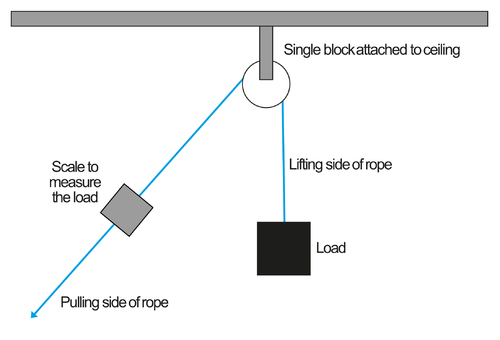
Mount a block on the ceiling and pass a rope through it.
On one side (the lifting side), the rope is attached to the first scale, which in turn holds up the fabric bag with the load of three bottles (= 4.5 kg).
The second scale is attached to the other end of the rope (pull side).
Observe:
- What happens when the fabric bag with the counterweights is raised?
- Do the scales on each side of the block show the same weight?
- What conclusion can be drawn from this?
- What is the application in everyday life of arranging ropes and blocks in this way?
- What are the benefits of using a pulley, rather than lifting the load directly?
Exercise 2: Single block with pulling rope inserted in wall to gain power
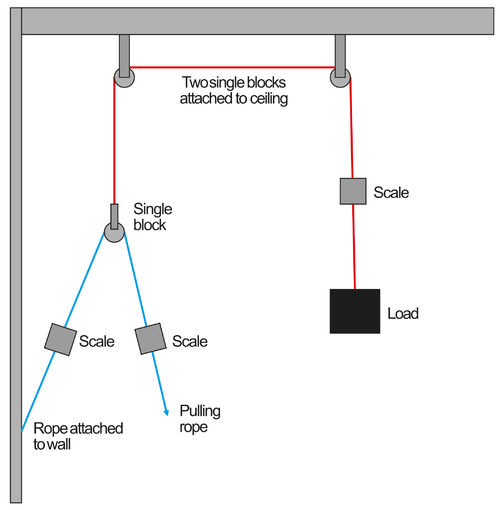
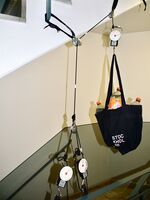
Mount a block so that it is held up by a rope (lifting rope) that goes up to the ceiling where the rope runs on through a block (or two blocks if necessary) to the first scale which in turn holds up the fabric bag with the load of three bottles (= 4.5 kg).
Fix the second scale to the wall and attach a rope (pull rope) to the other side of the scale. This rope goes up and through the hanging block. The free end of the rope continues to the third scale. On the other side of the third scale, a final rope is attached, which is the pull rope.
Observe:
- What happens when the fabric bag with the counterweights is raised?
- What do the three different scales show?
- What is the length relationship between the rope used as the pulling rope and the one used as the lifting rope?
- What conclusion can be drawn from this?
Exercise 3: Double block and tackle to gain power
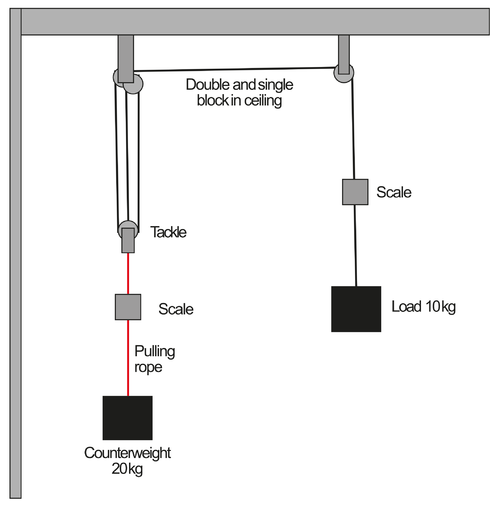
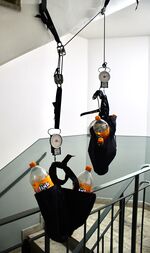
Assemble a combination of one single and one double block. The double block is attached to the ceiling. Attach the lifting rope to the lower single block first. Let the rope go up into the upper double block and return to the lower single block. The lifting rope turns one last time in the lower single block, goes up through the upper double block and then runs on through a single block until it reaches the first scale, which in turn holds up the first fabric bag containing three bottles (= 4,5 kg).
The second scale is fixed under the lower single block and under it a second fabric bag that can be loaded with bottles (balancing weights).
Observe:
- How many bottles (balancing weights) must be loaded into the second bag before the first bag starts moving?
- What do the two different scales show?
- What is the relationship between the length of rope between the double blocks and the distance that the first fabric bag moves (measured relative to the floor or other fixed point)?
- What conclusion can be drawn from the relationship between the weights of the two bags and the length distance of the ropes?
Exercise 4: Double block and tackle to gain speed
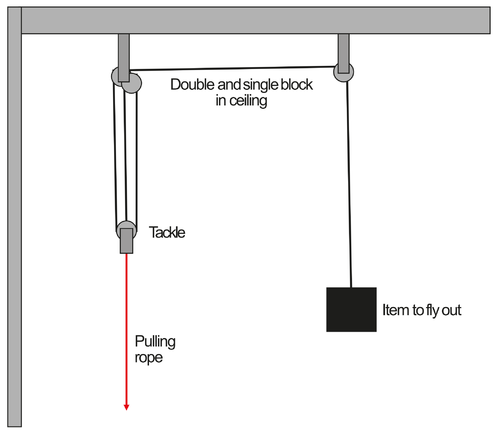
Assemble the same technical arrangement as in Exercise 3, but without the load and balance bags. The two scales can be removed if desired.
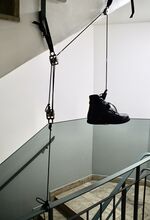
Attach a light object (piece of clothing, hat, shoe, etc.) to the end of the rope where the fabric bag with the weight was previously attached.
Observe:
- How fast can the light object (load) be moved when pulling on the lower free block?
- How heavy an object (load) can be moved in this arrangement?
- How can this arrangement be used to quickly remove an object from, for example, a stage?
Exercise 5: Block for changing direction when moving objects
This exercise is carried out at floor level. The aim is to move an object any distance across the floor. The exercise begins by first determining the movement to be achieved. It is optional how and where blocks are arranged and how long pull ropes are used.
In a second step, move the object in two stages, each in a different direction. In this step several blocks and ropes can be used.
Observe:
- What has been prioritised in the arrangement of the blocks - gaining power or high speed?
- Has the intention been to hide the arrangement of blocks and ropes or has it been allowed to show?
- For complex movement - how many blocks and ropes have been used?
- Are there alternative solutions to the problem?
Assessment and feedback
The exercises are not intended to be formally assessed. Give feedback throughout the workshop; students will want to ask questions and discuss the results during the practical exercises. At the end of the session, summarise the key points of learning.
Our Experience
Tips
Make sure you are familiar with how block and tackle and rope will work together to gain load, force and speed.
If you don’t have access to a suitable space where you can suspend weights, you could run the workshop using smaller scale equipment. Our experience has shown that rope and pulley mechanisms work correctly and give a good simulation of the full-size mechanism at a scale of 1:4, and even 1:6 is likely to be satisfactory to demonstrate the principles. Working at scale greatly simplifies the workshop, and means you can hang the load from a camera tripod or similar improvised support.
Safety Notice
The scale of the exercises as described here means they are relatively safe, compared with full-size stage working. However, you will still be lifting weights overhead, and possibly working at height to attach pulleys, and so on. Make sure you follow safe working practices, and if in any doubt, consult a competent theatre technician. Always undertake a risk assessment, following the safety standards and regulations in your locality.
Credits
| This learning method was made by: | Anders Larsson |
| Institution: | Stockholm University of the Arts |
