Aims[edit]
By creating a camera obscura, you will find out about:
- The fundamentals of the optical systems used in cameras and projectors
- Some of the optical theory of image and shadow sharpness
- The early history of image-making and projection
- The performance potential of simple technologies
Additionally, the project can be an opportunity to develop practical, craft skills working with basic materials.
Key Information[edit]
| Number of learners | Minimum 1, maximum 10 |
| Number of staff | The project can be done as a structured classroom activity with one teacher, or by one or more people working independently. |
| ECTS Credits (if applicable) | Not applicable |
Learning process[edit]
| Lecture/seminar | Lecture, presentation, discussion (face-to-face or online) | |
| X | Making project | Making a model, mock-up, plan or design (physical or digital) |
| Performance project | Making a performance or demonstration (live or mediated) | |
| Records and Archives | Interviews, photographs and videos of artefacts, annotating archives, creating learning materials (physical or digital) | |
| X | Independent study | Reading, researching, analysing and evaluating learning materials (physical or digital) in groups or alone |
Type of learner[edit]
| X | Student of technical theatre |
| X | Student of theatre design, architecture |
| X | Student of theatre arts |
| X | Professional |
| X | Researcher |
| X | General public |
What You Will Need[edit]
Duration and schedule[edit]
Preparation by teacher:
1-2 hours to gather physical materials and learning materials. It is recommended to do a test of the planned method of creating the camera obscura, to ensure it works effectively.
Preparation by learners:
None.
The project can be done in half a day, but can be extended by further experimentation.
Room or type of space[edit]
A classroom or workshop space, with tables. It is helpful to have windows with a view, to provide a well-lit scene to look at through the camera obscura.
Equipment[edit]
Required:
Scissors, craft knife, cutting mat. Something to make a small hole in an aluminium drinks can, such as a bradawl or a small nail and hammer.
Optional:
Video or still photography camera with a tripod to record the results of the project.
Materials (consumables)[edit]
Required:
A cardboard box for each person. This can be as small as a shoebox, or much larger.
Black paper, tracing paper or white tissue paper (semi-transparent), adhesive tape.
An aluminium drinks can, or an aluminium foil food dish.
For each person, piece of heavy cloth that light does not come through, large enough to go over the cardboard box and the head of the person. If necessary, you can improvise with coats, blankets, duvets, and so on.
Learning resources (books, websites)[edit]
The history and basic theory of the camera obscura is described on Wikipedia: https://en.wikipedia.org/wiki/Camera_obscura
Video guide to making a camera obscura: https://youtu.be/5I-bOBsQT74
Process[edit]
Preparation[edit]
Gather the materials required.
The learning activity[edit]
Making the camera obscura:
Use the craft knife and scissors to cut the ends off the aluminium drinks can. Then cut a square piece from the side of the can, about five centimetres square. Take care not to cut yourself with the tools or the edges of the cut can, which can be very sharp. Alternatively, use an aluminium foil food dish (such as pies come in), which can be cut with scissors.
Use the bradawl or a nail and hammer to make a small hole in the centre of the piece of aluminium. The smaller the hole, the sharper the image will be, but the darker it will be. You may need to experiment to find the best compromise.
Cut a hole in the end of your cardboard box about one or two centimetres square, and tape the piece of aluminium over it.
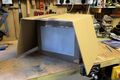
At the opposite end of the box, cut out a large hole, just smaller than the side of the box. Tape tracing paper or white tissue paper over this hole to form the viewing screen.
Using the camera obscura:
Point the end of the camera obscura with the small hole at a window or other brightly lit scene. If it is dark outside, try using a computer screen as your subject, with the room lights off or dimmed. Place a cloth over the top of the camera obscura and your head to cut out the light in the room.
Wait for your eyes to adjust to the dim image on the screen – this may take several minutes. You should now be able to see the scene in front of you, upside down and reversed left-to-right.
Simple experiments:
- Try different sized holes; look at the effect on the brightness of the image, and its sharpness.
- Try different sized and shaped boxes - what happens to the image?
- Try holding different lenses over the hole; what effects do they create?
More complex experiments (these will require additional time and equipment):
- Use a camera to photograph the scene on the screen of the camera obscura. You may need a tripod and a slow shutter speed to get a sharp image. Phone cameras with a ‘night mode’ can also work well.
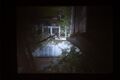
- Create a performance to be played outside the window, and video it on the screen of the camera obscura. What kind of experience does this create? How can you use this effect as part of your story-telling?
- Create a lighting installation outside the window, and video it through the camera obscura at night.
Assessment and feedback[edit]
The project gives opportunities to experiment and made your own discoveries, as well as learning directed by a teacher. Teachers can use questions to guide learners towards different aspects of the project, as well as testing their understanding.
Our Experience[edit]
Tips[edit]
The usual difficulty with making a camera obscura is that the image is not bright enough. Experiment with the size of the hole to find the best compromise between brightness and sharpness of the image. Ensure there are no other sources of light in the room and the blackout from your cloth is good – even a small light leak can make it very hard to see the image.
Make sure you allow enough time for your eyes to adapt to the low light levels. Full adaption can take up to 30 minutes, and is slower and less complete for older people.
Additional information and resources[edit]
We made our camera obscura in a shed.
Making the camera obscura:
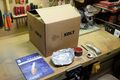
The main materials and tools
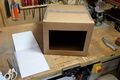
The hole for the screen

The hole for the pin-hole
The prepared box
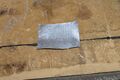
Aluminium foil for the pin-hole
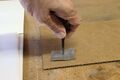
Making the pin-hole
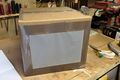
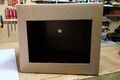
Tracing paper taped in place
Pin-hole taped in place
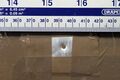
The pin-hole is about 3mm diameter


Controlling the ambient light:
Our shed has only one window, so rather than use a coat or blanket to block out the light, we used cardboard to block out most of the daylight from the window and make it dark enough inside the shed to see the image:
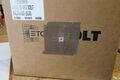
Making a hood from card
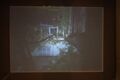
Low contrast due to too much ambient light
Higher contrast after ambient light reduced
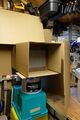
The set-up in the shed
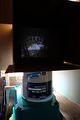
Image and ambient light are roughly equal


The result:
We photographed the camera obscura image, and with a little editing, here is the result:
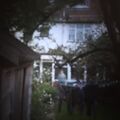
An image from the camera obscura

Credits[edit]
| This learning method was made by: | Dr Nick Hunt |
| Institution: | Rose Bruford College of Theatre and Performance |