Aims[edit]
The project will:
- Introduce you to the workings of a salt water dimmer
- Demonstrate basic electrical principles
- Allow you to explore the detail design considerations of salt water dimmers.
Key Information[edit]
| Number of learners | The project can be done by small groups of 2-4 working together, or as an individual activity. |
| Number of staff | The teacher. |
| ECTS Credits (if applicable) | Not applicable. |
Learning process[edit]
| Lecture/seminar | Lecture, presentation, discussion (face-to-face or online) | |
| X | Making project | Making a model, mock-up, plan or design (physical or digital) |
| Performance project | Making a performance or demonstration (live or mediated) | |
| Records and Archives | Interviews, photographs and videos of artefacts, annotating archives, creating learning materials (physical or digital) | |
| X | Independent study | Reading, researching, analysing and evaluating learning materials (physical or digital) in groups or alone |
Type of learner[edit]
| X | Student of technical theatre |
| Student of theatre design, architecture | |
| Student of theatre arts | |
| X | Professional |
| X | Researcher |
| X | General public |
What You Will Need[edit]
Duration and schedule[edit]
Building the dimmer takes 1-3 hours. Additional exploration of the concept can take another 1-3 hours.
Room or type of space[edit]
A workshop or making space. The project involves water, so bear this in mind when choosing a space.
Equipment[edit]
- Glass jar or similar container
- 12-volt lighting transformer. It is important the transformer outputs alternating current (AC). A direct current (DC) supply will work, but it will electrolyse the salt water, generating oxygen, hydrogen and chlorine gasses which are a potential fire and poisoning hazard.
- 12-volt light source, such as a ‘birdie’ spotlight, or a domestic light fitting. Lamps for car brake or side lights are also suitable.
- Tools:
- Electrical wiring tools – cutters, wire stripper, screwdrivers
- Hot glue gun
- Hacksaw
- Craft knife
Materials (consumables)[edit]
- Water
- Salt (ordinary cooking salt)
- Flexible electrical cable
- Single core electrical cable
- Connector blocks
- Plastic tube
- Plastic sheet
- Various sizes of wood
- Glue sticks
- Screws and bolts
Learning resources (books, websites)[edit]
Demonstration and explanation of the salt water dimmer by Jonathan Bastow: https://youtu.be/wRMEAYYW0dc
Process[edit]
Preparation[edit]
Gather tools and materials.
Prepare a short introduction to the concept of the salt water dimmer, and its historical application.
Prepare a safety briefing.
The learning activity[edit]
Introduce students to the concept of the salt water dimmer, and its use in the early days of electric lighting in theatre.
Give students a safety briefing, covering the following points:
- The project operates at 12 volts, and so is electrically safe. If the transformer you are using is not pre-wired with a mains cable and plug, the mains side of the transformer should be wired by an electrically competent person.
- Safety eye coverings are advised.
Stage 1 – initial test and demonstration[edit]
The dimmer needs two electrodes – one in the bottom of the glass jar, and one to be lowered into the water. Use the single core cable to make these, so they can be bent to shape and stay in position. See the photos for the details of these.
Fill the jar with water, and add salt. The more salt you add, the better the water will conduct electricity, which can mean that the light comes on as soon as the top electrode touches the water. Start with a tablespoon of salt, and add more if necessary.
Wire up the transformer output to the dimmer and the light source.

Once everything is wired up, plug in and turn on the transformer. Gently lower the top electrode into the water, and down towards the bottom electrode. You should see the light gradually come on. When the two electrodes touch, the light will come on to full brightness. Watch the video below to see how this works.
At this stage, you have a working dimmer, but you may find either the light starts to glow as soon as the top electrode makes contact with the water, or it only starts to fade up when the two electrodes are very close together. Try:
- adjusting the amount of salt in the water. The more salt, the more conductive the water will be, the more easily the current will flow, and the brighter the lamp will be for a given position of the top electrode.
- cutting a length of plastic tube to the height of the jar, and placing it over the bottom electrode while lowering the top electrode down through the tube. This will reduce the flow of current and make the light dimmer for a given position of the electrode.
Stage 2 – controlling the dimming action[edit]
To make your dimmer more controllable, you can build this slightly more sophisticated design.
If you found the dimmer more controllable with the plastic tube, use the hot glue to stick the tube to a base of plastic sheet, including a bottom electrode. Use hot glue to make sure the joint is watertight, especially round the cable.
Make a lever on a stand to control the dimmer with – see the photos. Make sure you work out the travel of the top electrode you need to give the full dimming range from off to fully on. Use a long lever on the operating end to give a high level of control.
Connect up your new dimmer, and test it out. If you have got the travel on the lever right, you will find you have a good level of control of the brightness. You will probably find that the light level ‘jumps’ up to full when the electrodes come into contact – this is very difficult to avoid.
Stage 3 – extension activities[edit]
Once you have made a functioning dimmer, you might want to do some of these additional activities:
- Make a scale for your dimmer handle, so you can reliably set a brightness level.
- Make several dimmers, to control multiple lights. What difficulties do you encounter when trying to control several dimmers? How can you solve them?
- Experiment with lamps of different wattages. How does this change the way the dimmer works – does the lamp start to glow at the same position of the handle? Does it face up in the same way? Investigate how you can make several dimmers work the same, so you can have all the lights fading up and down at the same rate.
Assessment and feedback[edit]
The project is not designed to be formally assessed. Students get feedback informally during the process from the teacher. A group discussion at the end of the project will help students reflect on and embed what they have learned.
Our Experience[edit]
Tips[edit]
The project works best with a traditional wire-wound transformer and an incandescent (tungsten filament) lamp. These are increasingly difficult to obtain, however. Electronic transformers meant for incandescent lighting generally work well. Dimmable LED lamps should be OK, but make sure they are the 12 volt type. Most fluorescent lamps will not be suitable.
The project may require some experimentation to get it to work – small changes in the materials, size and configuration of the various parts, the type of lamps and transformer used, and the strength of the salt solution, all make a difference. Treat it as a science experiment, testing alternative set-ups, making notes of what works, and thinking through what you observe. A basic knowledge of electrical circuits will help you here.
Safety Notice[edit]
Please note the safety guidance above. The original salt water dimmers worked using mains electricity, and so were potentially very dangerous. They did not have to comply with modern safety standards, but you should only build this dimmer system using a 12-volt transformer and lamps. If in any doubt, consult an electrically competent person. Always undertake a risk assessment, following the safety standards in your locality.
Additional information and resources[edit]
Photos of our salt water dimmer:
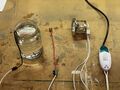
L to R: jar with salt water; top electrode, lamp, transformer
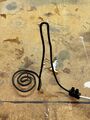
Bottom electrode
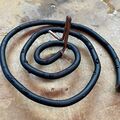
Close-up of bottom electrode
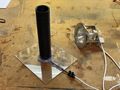
Tube dimmer
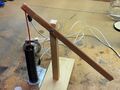
Tube dimmer and lever


Videos of our dimmer in action:
Stage 1 demonstration - dimmer in a jar: File:IO4 17 Salt Water Dimmer 08.mp4
Stage 2 demonstration - dimmer in tube with lever: File:IO4 17 Salt Water Dimmer 09.mp4
Credits[edit]
| This learning method was made by: | Nick Hunt |
| Institution: | Rose Bruford College of Theatre and Performance |