Aims[edit]
By analysing, drawing and modelling this scenography, students will learn:
- about the ideas and designs of a selected historic scenographer and production
- how to interpret archive documents
- basic drawing of set and movement plans
- basic 3D modelling, including texturing and basic lighting of a set design
Key Information[edit]
| Number of learners | Minimum 1, Maximum 12. Individual work and group sharing. |
| Number of staff | 1 teacher with knowledge of set design, technical drawing and 3D modelling. |
| ECTS Credits (if applicable) | 2 |
Learning process[edit]
| Lecture/seminar | Lecture, presentation, discussion (face-to-face or online) | |
| X | Making project | Making a model, mock-up, plan or design (physical or digital) |
| Performance project | Making a performance or demonstration (live or mediated) | |
| Records and Archives | Interviews, photographs and videos of artefacts, annotating archives, creating learning materials (physical or digital) | |
| Independent study | Reading, researching, analysing and evaluating learning materials (physical or digital) in groups or alone |
Type of learner[edit]
| X | Student of technical theatre |
| X | Student of theatre design, architecture |
| X | Student of theatre arts |
| X | Professional |
| X | Researcher |
| General public |
What You Will Need[edit]
Duration and schedule[edit]
Preparation by the teacher: 1-2 hours
Preparation by students: none, if they have experience of working with vector drawing software and a basic knowledge of 3D modelling and computer-based lighting.
It is best to organise the workshop in several sessions: 24 hours in 8 sessions of 3 hours each, 4 for the two-dimensional work and 4 for the three-dimensional work.
Inexperienced students may need more time to develop their software skills.
Room or type of space[edit]
Classroom with drawing boards and computers.
Equipment[edit]
For each student: computer with vector drawing, 3D modelling and lighting software, set-square, protractor, scale ruler.
Materials (consumables)[edit]
For each student: sketch paper, pencils, eraser.
Learning resources (books, websites)[edit]

Canonbase articles:
- B.08 Architectures of Space and Image: The light beams and projections of Josef Svoboda
- E.06 Together in One Room: Hellerau and the fall of the fourth wall
- Josef Svoboda
- Adolphe Appia
Other resources:
Jarka Burian, The Scenography of Joseph Svoboda, 1974 (available online at https://digitalcollections.wesleyan.edu)
Process[edit]
Preparation[edit]
Select a scenographer and a specific production, such as Josef Svoboda’s design for Romeo and Juliet. Gather information about the scenographer and their work, and the selected production, including images.
Make preliminary sketches of the scenography, adapting it to a stage the students are familiar with and have the technical details for.
The learning activity[edit]
Introduce the students to the project, and the chosen scenographer and production.
Working from the teacher’s preliminary drawings and archive materials such as photographs, students carry out a compositional study of the scenography, sketching it to become familiar with it.
They then make a breakdown of all the elements in the scene and proceed to draw the first approximate sketch of its layout based on general blocks and their orientations. They then carry out a study of the entrances and exits, different levels, and so on.
Students scan the final sketch and import it into the computer to trace the general layout and adjust it to the theatre plans, placing all the necessary steps and platform heights. Before dimensioning and finalising the plan, they start modelling the proposal to check if the composition matches the original design, or if any of the blocks need to be adjusted.
Finally, add to dimensions the plan. The scenography can now be textured and illuminated if desired.
Assessment and feedback[edit]
The project can be assessed based on a range of criteria, according to the needs of the course: research, analysis and interpretation, 2D and 3D drawing skills, and so on. The finished model and drawings can be submitted for assessment, or students can present them to the group.
Our Experience[edit]
Tips[edit]
It is important that students analyse and understand the scenographic concept and the staging before starting to draw.
It is a good idea to have the students discuss their progress with the teacher at key points during the project, to ensure they don’t go too far in the wrong direction.
Depending on the experience of the students, you may want to choose a historical scenography that is easier to draw, such as the staging of C.W. Gluck’s Orphée et Eurydice, designed by Adolphe Appia for Hellerau, 1913.
Additional information and resources[edit]
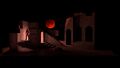
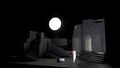
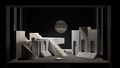
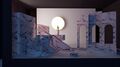
Plans and 3D modelling by students of RESAD, April 2021, showing their reconstructions of Josef Svoboda's design for Romeo and Juliet:
CAD plan by Robert Abad - File:IO4 29 10.pdf
CAD cross section by Robert Abad - File:IO4 29 09.pdf
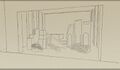
Sketch by A. Burgos
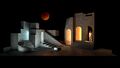
Rendering by A. Burgos
Rendering by A. Burgos
Rendering by A. Burgos
Rendering by L. Baquero
Rendering by N. García
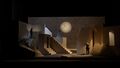
Rendering by O. Prado


Credits[edit]
| This learning method was made by: | Almudena López Villalba |
| Institution: | Real escuela superior de arte dramático de Madrid (RESAD) |
| Thanks to: | The students of RESAD whose work is included here as examples |